
Create text in the workspace and modify parameters such as size, font, and spacing. The left side of the precision toolbar will allow the font to be selected and display a preview of the selected font.
Parameters
 |
Defines the height of created text objects. The height parameter is a multiplier that adjusts the character height relative to the default width defined by the selected font. As the parameter is adjusted the cursor will change height to preview the new text height. |
 |
Defines the slant of text characters. Positive values will cause the letter to lean towards the right, negative values will lean the letter to the left. |
 |
Defines the width of the text characters. The width parameter is a multiplier that adjusts the character width relative to the default width defined by the selected font. |
 |
Define the spacing between characters. Positive values increase the spacing, negative values decrease the spacing |
 |
Adjust the location of the selected text up or down. Positive values move text up, negative values move text down. |
 |
Select the preferred text alignment. Left, Center, or Right justified. |
 |
Toggle which side of a line or curve the text is created on. |
Create Text
-
Activate the Add Text Command
-
Left click in the workspace to place the cursor. To create text on an arc or curve, left click the contour at the starting point for the text.
-
Select the text style, a preview will be shown to the right of the font selection.
-
Type text to create it in the workspace.
-
Select the Close button to exit.
Edit Existing Text
-
All of the text creation tools can be used to edit text, start by activate the Add Text command .
-
Left click on the text to be edited. The cursor will snap into place in line with the selected text.
-
Click and drag across characters in the text to select them. A box will appear around each character indicating it has been selected.
-
Modify the text parameters in the toolbar to change the selected text.
-
Select the Close button to exit.
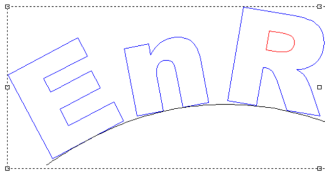
Edit Text Character Spacing

-
Select the text to be edited.
-
Activate the Edit Existing Text command .
-
Click on the text to be edited.
-
Colored points will appear to edit the text with.

-
The Green Point changes the starting point of the line, the Blue Point adjusts individual letter spacing, and the Red Point equally adjusts the spacing of all letters.
Convert Text to Curves

Text objects must be converted to curves before toolpaths can be generated.
-
Select the text objects to be converted.
-
Activate the convert text to curves command and the text will be converted immediately.
-
The text display colors will change from the text object display color to the standard contour display colors.
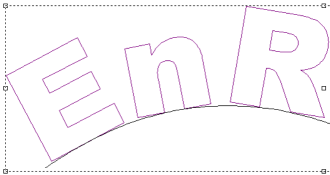
Text Object Text Converted to Curves